Another MTL RTA landed on my dissection table, thanks to Sourcemore. The Ares series itself is quite divisive, especially the V2, because people generally either love it or hate it. However, this time Innokin has strived with the Ares Finale to create a tank that everyone can be justly satisfied with. It’s already certain that we get a lot of items with it, and there have been some cosmetic updates too. We can make more airflow adjustments with the renewed external airflow inlet, and it has also become much simpler to configure the internal airflow inlet to our needs. As for the top cap, they opted for the widely popular bayonet lock solution. But I won’t spoil all the fun upfront, so you can read about the rest shortly. To be honest, I liked both previous Ares models, so I started this test with the expectation that I wouldn’t be disappointed. Whether I was right will soon be revealed. Let’s get started!
Innokin Ares Finale MTL RTA Experience Report
Contents of the Box and Getting Acquainted with the Tank
In the side-sliding box, we first meet Phil Bussardo and Dimitrios Agrafiotis, or VapinGreek, who worked dedicatedly on all three Ares MTL RTAs. The package also includes a user manual, and a card conveying Phil and Dimi’s well wishes, hoping that the Ares Finale will bring much joy to all MTL and RDL users. It’s very sweet of them. ![]() It also contains three small paper bags, which I will open right away, and of course, the tank and a grayish spare glass are also hidden in the box.
It also contains three small paper bags, which I will open right away, and of course, the tank and a grayish spare glass are also hidden in the box.
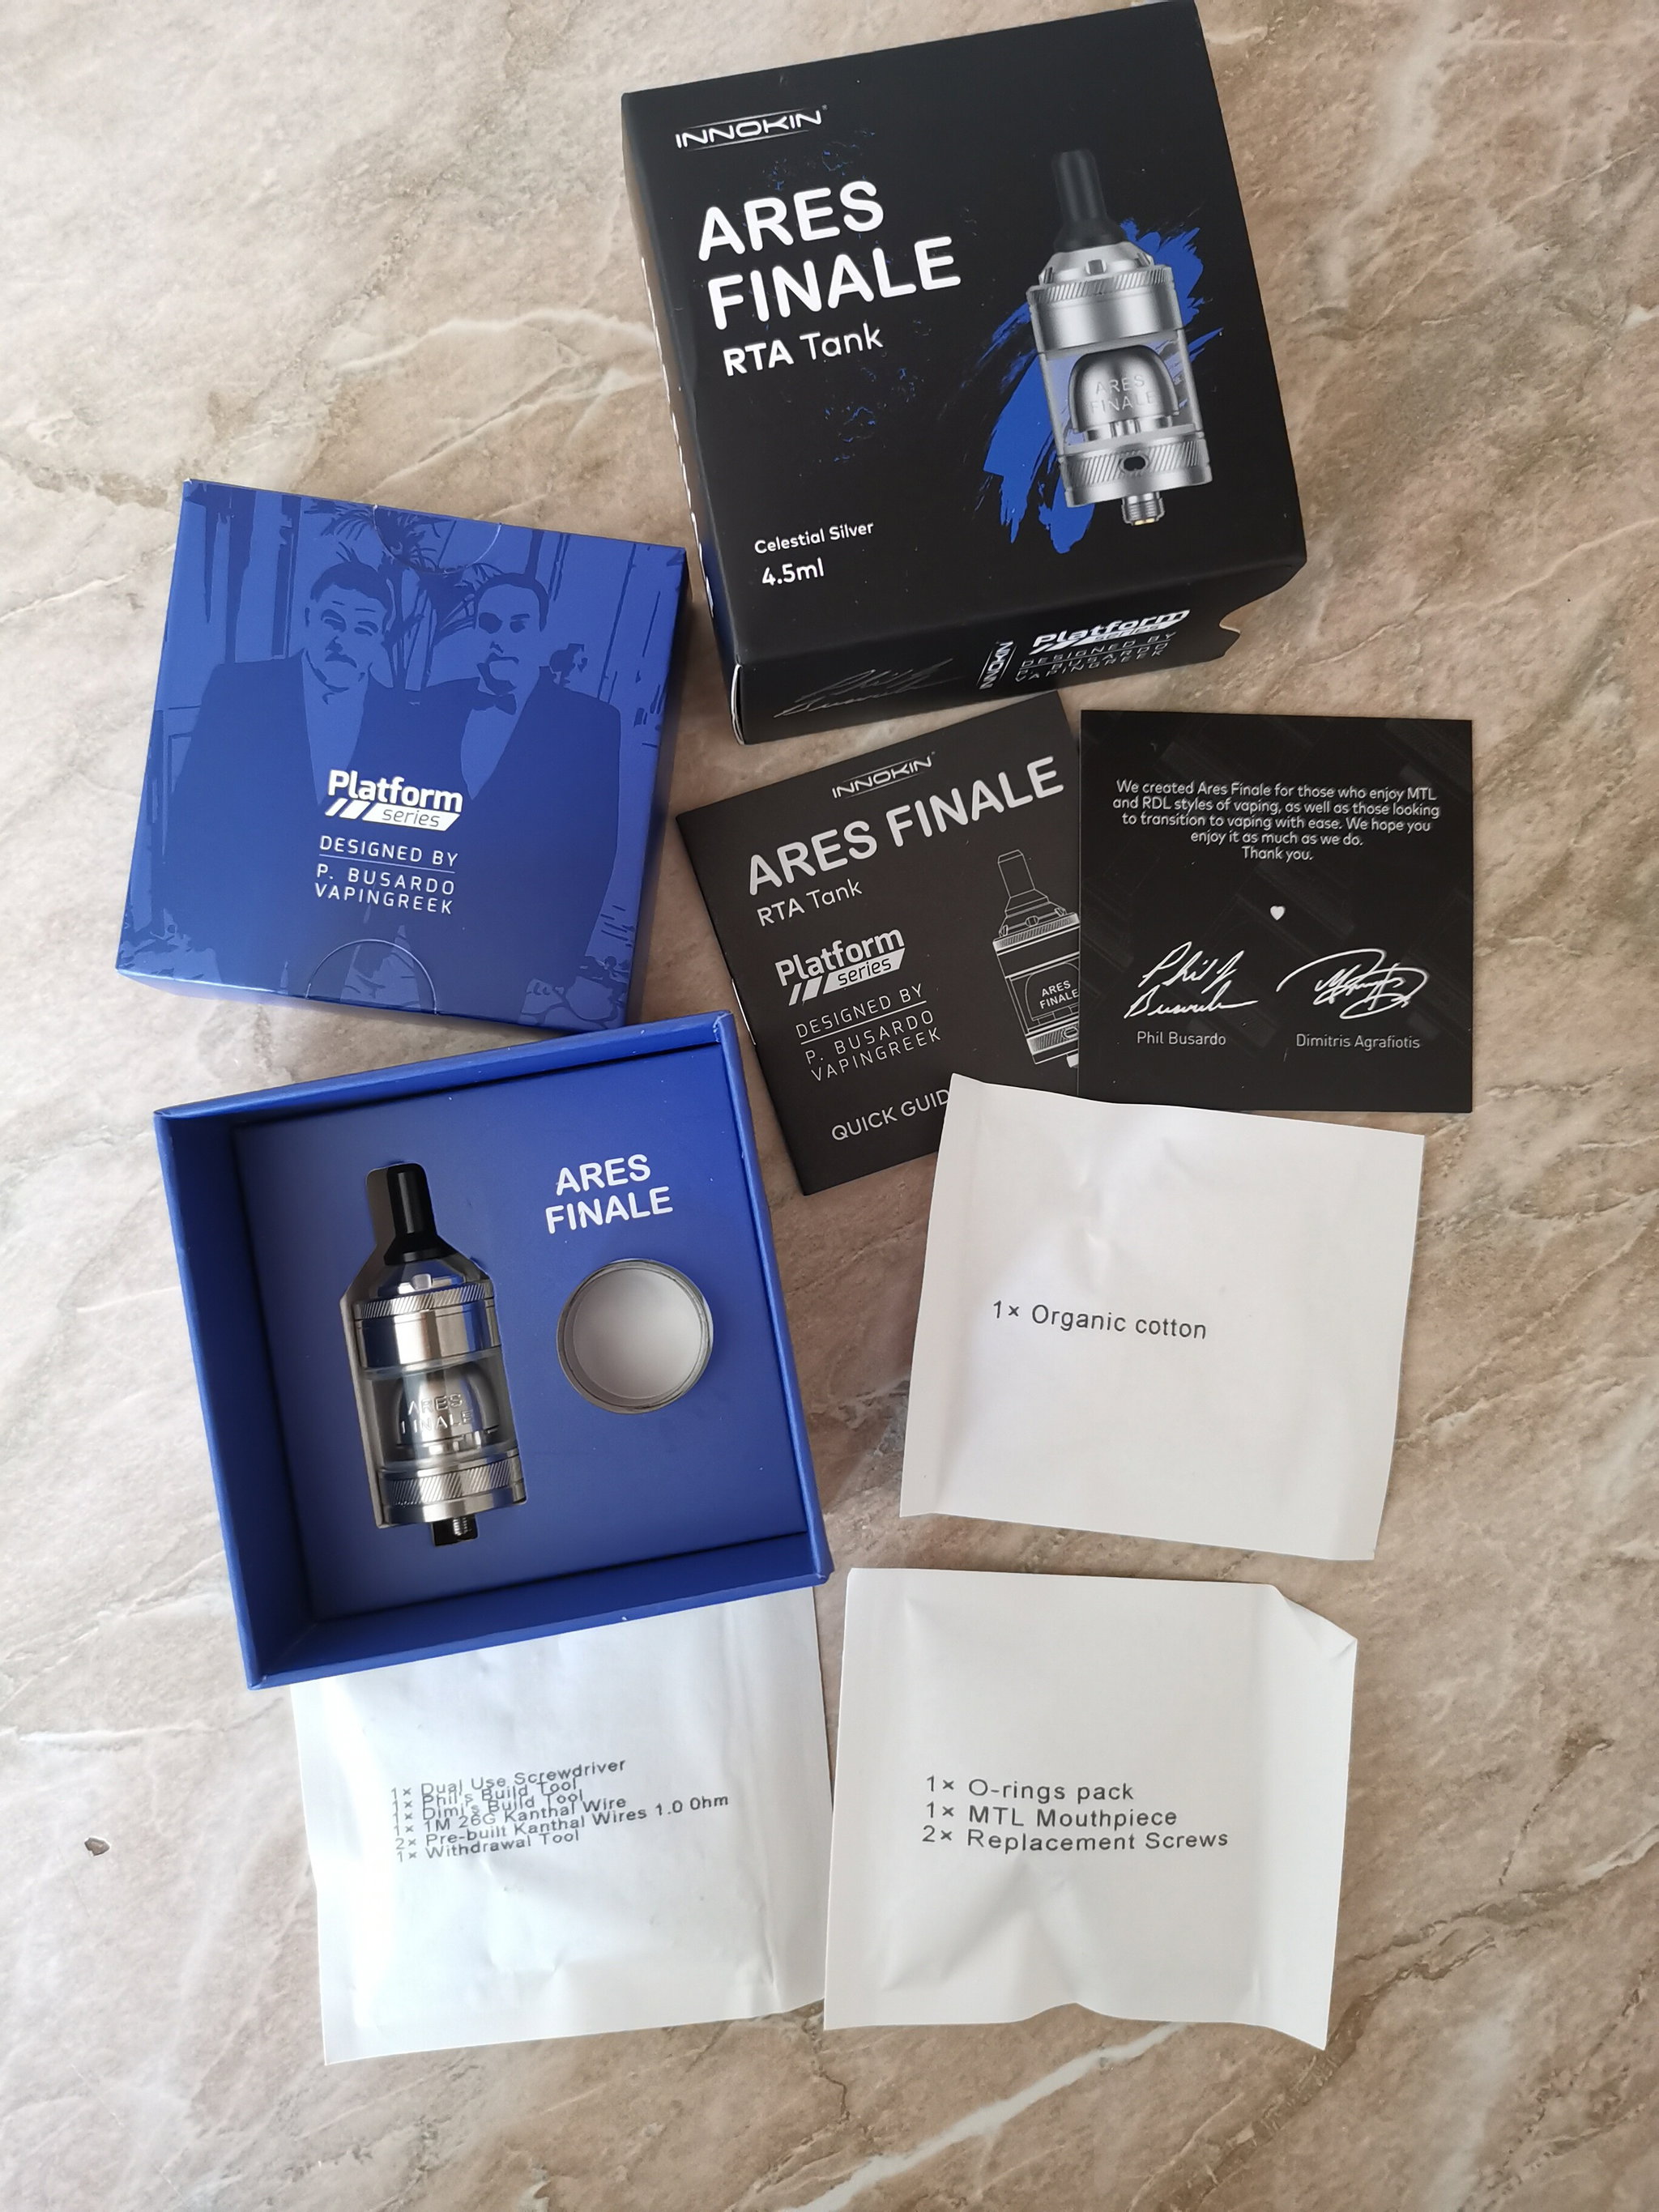
There’s nothing interesting in the first paper bag, just some Japanese cotton, so let’s look at the second paper bag, which contains two types of coil jig. One specifically for spaced coils, and another that can also be used for microcoils. We also get a double-sided screwdriver, one end being Phillips and the other flathead. Since we also get cotton, pre-wound coils can’t be missing from the package, which means 2x 1 ohm coils, 7 wraps of Kanthal on a 3mm mandrel. So, if I understand correctly, this would be the manufacturer’s recommendation. Next to that, there’s also 1 meter of 26ga Kanthal. That small metal “bottle opener” helps to disassemble the 3 in 1 Chamber, but I couldn’t find an exact name for it on the manufacturer’s website, nor is it listed in the accessory list. The paper bag just says “withdrawal tool,” which in free translation means a removal tool, so for me, it remains a small metal “bottle opener” featuring Ares, the god of war’s helmet.

The third paper bag contains only 2 spare Phillips grub screws, another drip tip which is much thicker and shorter, but has the same inner diameter as the longer one that comes with the tank. And of course, we find the indispensable spare O-ring set in this package as well. Unfortunately, one of the smallest O-rings got stuck in the perforation of the paper bag, so when I cut off one side, I successfully cut the O-ring too. It would have been better if I had torn it open…

The spare glass, viewed a bit closer, I think it’s tinted or coated with something. If I’m right, although I haven’t scratched it, it will eventually shed its coating. It’s not too dark, so it will still be visible how much liquid is in the tank.

Next is the tank, whose parts from left to right are: Drip tip, the bayonet lock top cap, the RTA sleeve, a hollow screw that holds together the RTA sleeve and the filling port located to its right, this also forms part of the chimney, and of course, the glass viewer, or sleeve. As you can see, it doesn’t consist of many parts, and its assembly is not complicated.

However, it deserves an extra red dot that the Chamber can also be disassembled with the help of the small metal “bottle opener.” This is extremely practical for cleaning.

There is a bayonet-like lock on the RTA sleeve and the bottom of the filling port, but it’s not exactly that. We just need to align these, without twisting, but we need to be careful that the two small tabs on the RTA sleeve fit precisely into the recess at the bottom of the top cap, which is shaped like those two small tabs. Then, we insert the hollow screw, which could also be called a chimney, into its place, thus assembling the 3 in 1 Chamber, which is the filling port, chimney, and RTA sleeve all in one.

However, without the small metal “bottle opener,” the parts cannot be properly tightened. This is because we use it to screw the hollow screw, or chimney, into place. If it’s not tightened properly, the entire Chamber can wobble, and it wouldn’t be good for the vacuum either, so always make sure it’s screwed in all the way.

In the usual way, we screwed the glass on from the bottom, which stays in place by screwing in the deck. When disassembling the tank, be careful that the O-rings at the bottom of the filling port and on the deck, which seal the glass, tend to stick to the glass, so we can easily lose them during washing. Therefore, don’t forget to check the O-rings when disassembling.

Only the bayonet lock top cap is missing from the top, where it’s clearly visible that the lock elements are quite small, but this is advantageous during use because it’s quite tight, though it requires a bit of effort to turn it into place during filling. However, the top cap’s upper seal is mainly responsible for this, as it touches the top cap completely, thus offering some resistance. Inside the top cap are Phil and Dimi’s monograms in a heart, to let us know how much they love us. ![]()

Here, the 4.5ml capacity tank is assembled. If we were to buy the TPD edition, it would only have a 2ml capacity, but they didn’t reduce it by taking away from the glass, but rather it received a much narrower upper Chamber part.

It doesn’t look bad with the other drip tip either, but for me, it’s too wide, so it was a bit uncomfortable to use with it, and it didn’t take long to switch back to the longer piece that comes with the tank from the factory.

The 24mm diameter deck houses a maximally beginner-friendly atomizer space. We simply slide the legs of the wire into the posts and screw them down. The simplicity of the grooves also indicates the ease of wicking. Furthermore, those two small posts are a great help during building, as they enclose the airflow inlet.

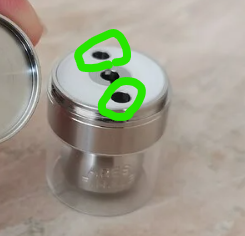
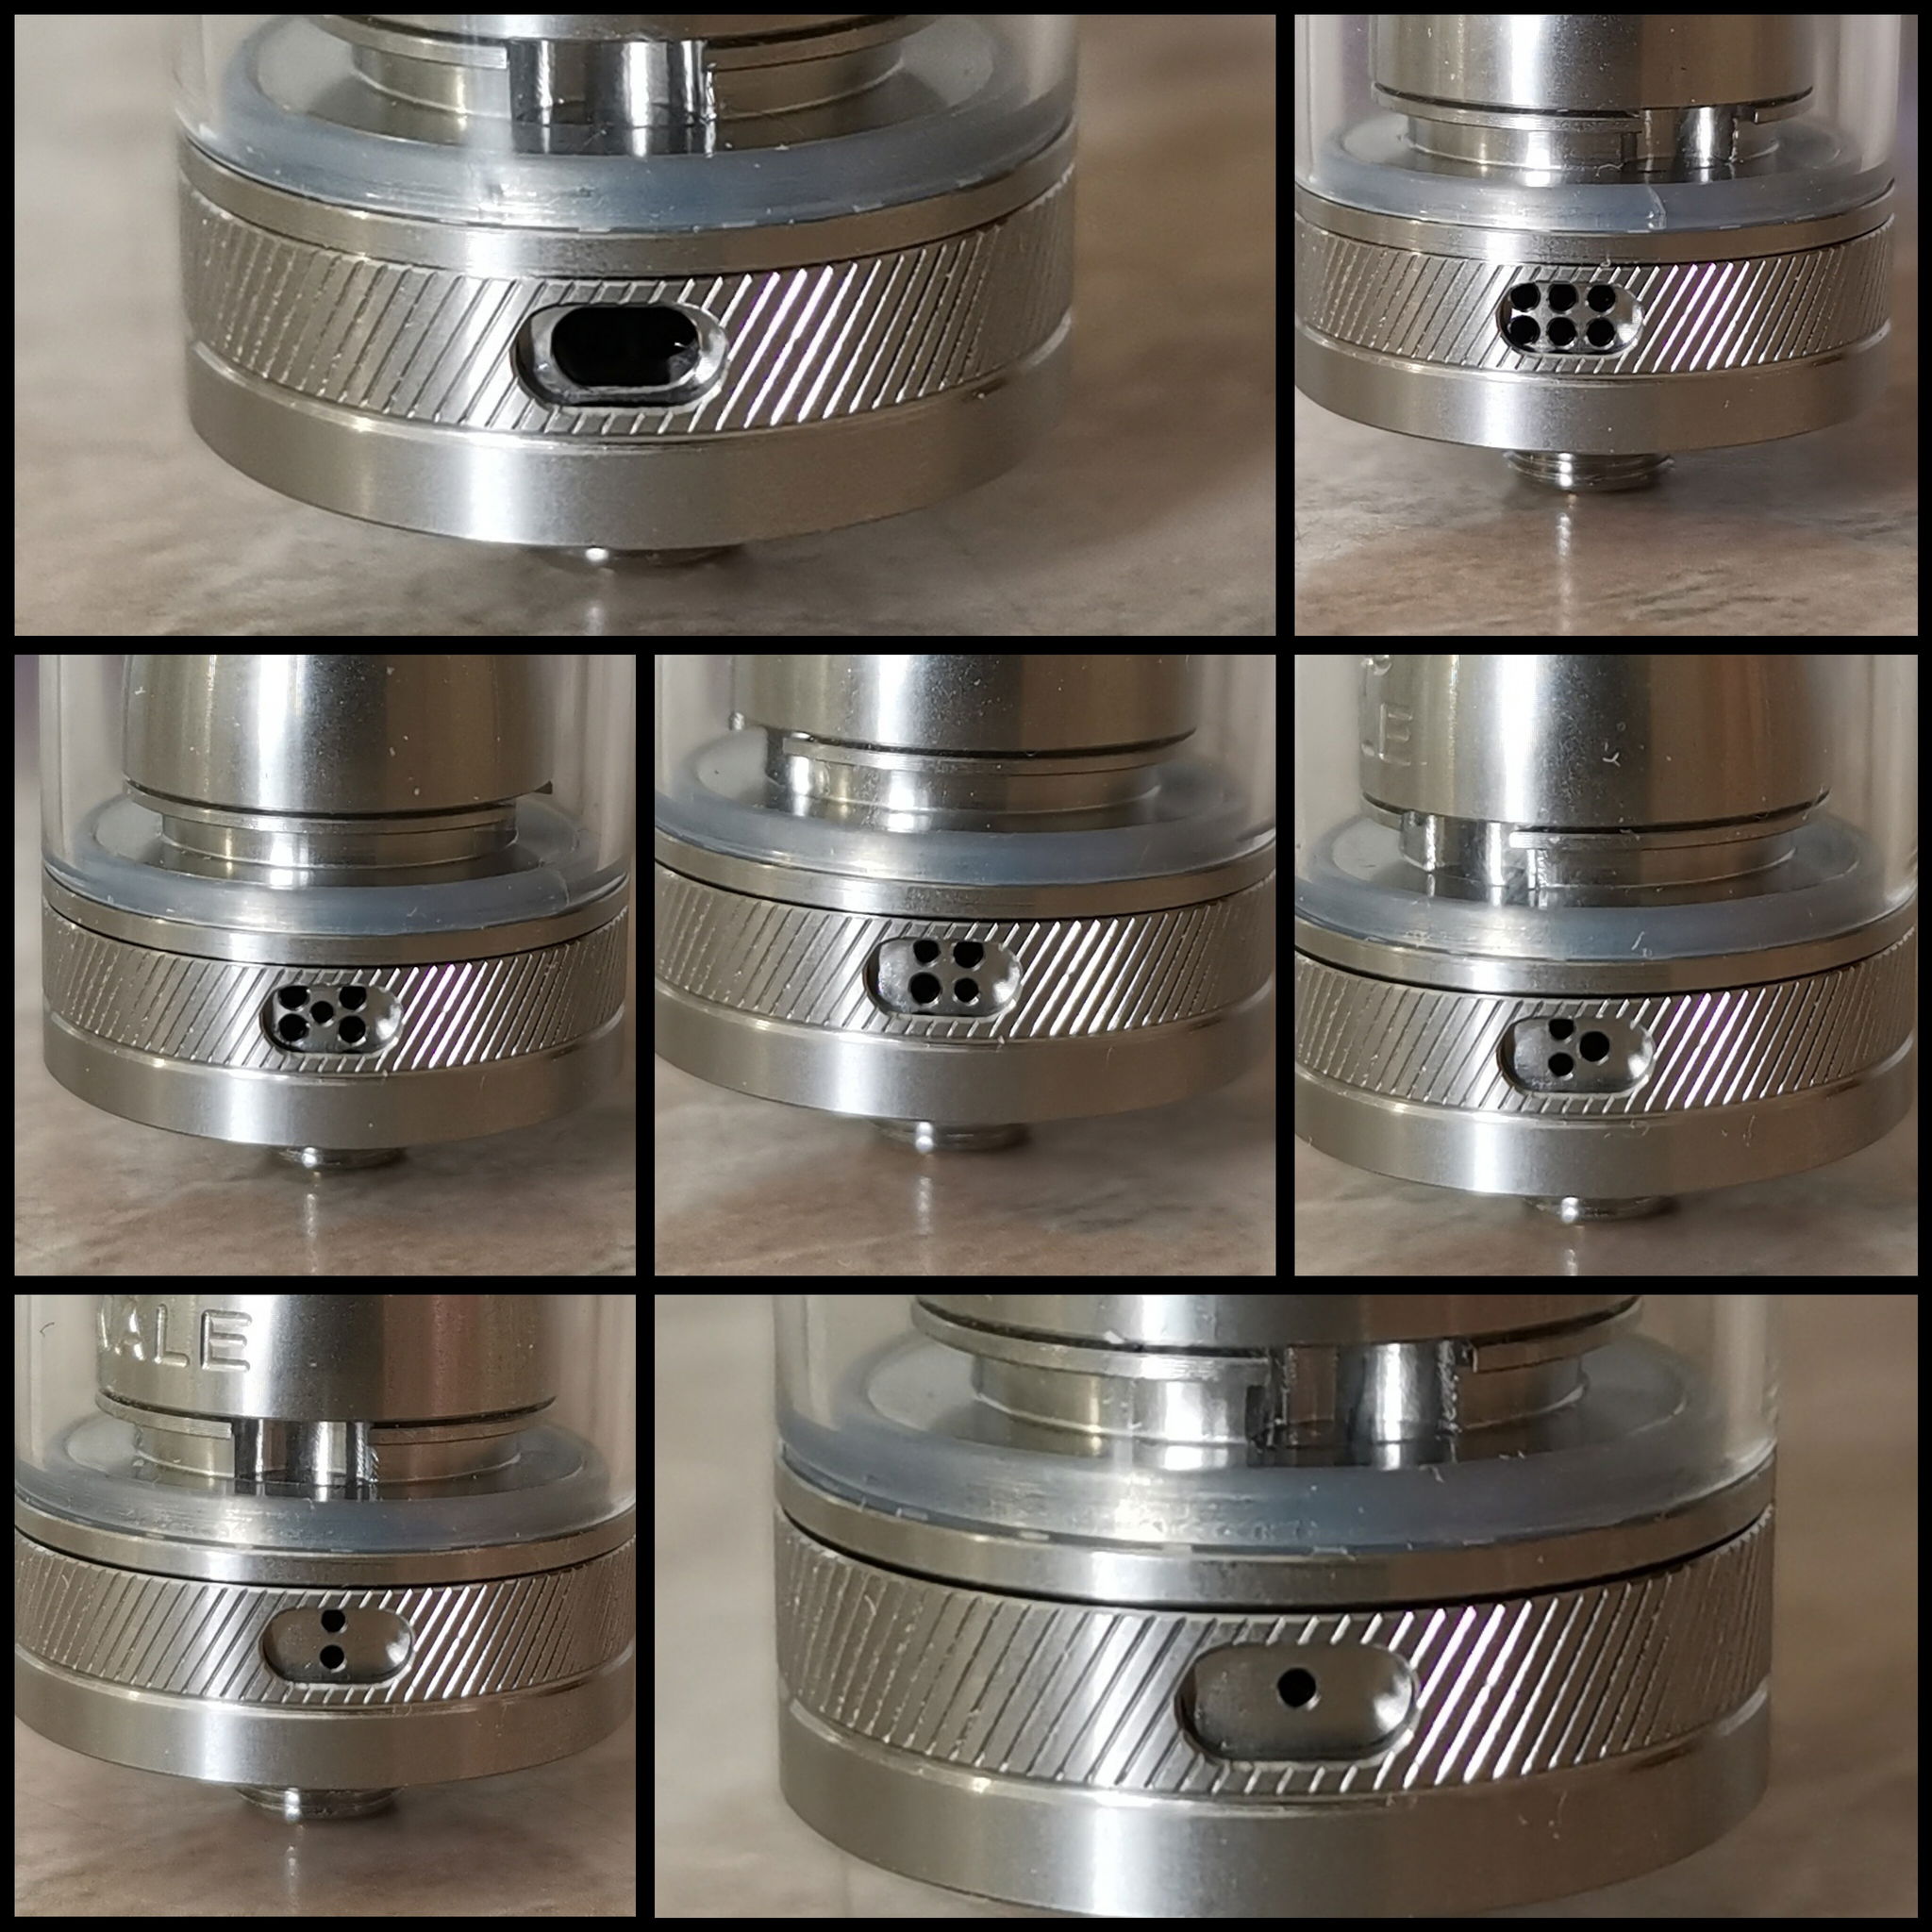
From a top view, it’s also visible that not much cotton fits into these grooves, but we’ll get to that later… Another interesting feature of the deck is that there’s an airflow adjuster here, which is much easier to turn compared to the V2, as you just push that small tab to the left, and the coil immediately receives less air. Since its design is quite flat, it’s ideal to turn it with a fingernail.


The external airflow control ring has 7 positions, which we can adjust steplessly from the tightest classic MTL to a truly airy RDL. Due to the holes, it is characterized by soft flavors and simultaneously soft and powerful airflow, which is the hallmark of a good MTL tank. The ring itself is not the easiest to turn, but the more we use it, the more it breaks in.
The Vortex bell further enhances the soft airflow, which also features vortex-patterned engravings to perfect the flavors. This essentially designates a path for the vapor to travel evenly, which I think has absolutely benefited the experience.

Let’s Coil!
For the first build, I wrapped 5 wraps of Kanthal around a 2.5mm inner diameter, naturally with Cotton Cloud’s cotton. As I mentioned, not much cotton fits in the grooves, but the amount required for a 2.5mm inner diameter is just enough; I’d almost call it loose, but this isn’t noticeable in the experience, as it didn’t cause any gurgling.

I first wicked the cotton and then placed it in position, as the amount of cotton needed for a 2.5mm inner diameter doesn’t always stay dry in the groove.

For the second coil, I wrapped 7 wraps of Kanthal around a 3mm inner diameter to better match the manufacturer’s recommendation. The cotton remained Cotton Cloud’s. Here, due to its quantity, the cotton is held more firmly by the groove, so it stays nicely in place even when dry. However, for a 3mm ID, it’s not advisable to use cotton denser than the aforementioned, as the RTA sleeve will compress it further, potentially leading to dry hits with denser cotton. Not to mention, too much cotton can be pulled by the deck’s threading when screwing it into place.

The cotton needs to rest on those two small metal posts that enclose the internal airflow control. This not only aids airflow but also dictates the maximum number of wraps. Therefore, the coil should not extend beyond those posts, meaning 7, at most 8 wraps. These posts are positioned exactly where the air hits the coil at the radius when the internal air inlet is fully open. This is a helpful guide for new builders, for which the manufacturer deserves another point!

As you can see, the Ares Finale is not a complicated tank, which makes it very likable. Building it can be said to be extremely simple, and wicking is not overly complicated either! The few improvements made to the Ares since V2 further contribute to the perfect experience, which you can read more about shortly. So, let’s get to the main point:
User Experience Report
In terms of material quality, the Ares Finale is excellent! Its weight is not excessive, so it won’t weigh down any pocket. The top cap stays rock-solid in place, and the airflow adjustment ring doesn’t twist with every little touch. Of course, it requires some effort, but since it’s built so robustly, I wouldn’t count this as a disadvantage, but rather express my satisfaction. This tank is so well-integrated that parts don’t rattle or wobble, and no part comes loose regardless of usage conditions! Except for the… (you surely expected this) …drip tip! It’s not a major issue, but wherever I put the set equipped with the Ares Finale, whether in my pants pocket or bag, when I took it out, the drip tip was slightly askew, so I always had to adjust it. This was true for both pieces, but more so for the longer one. Unfortunately, this poses a risk of losing it easily. However, two slightly thicker o-rings or re-threading would solve this immediately, and of course, it can be replaced with another one, so this isn’t a real complaint, just something I expected to be as stable as the tank itself. Two more things I noticed during testing: one is that under the top cap, there’s about a half-millimeter gap due to the bayonet lock, where dirt tends to accumulate. While this might detract from the tank’s aesthetics, it’s fortunately only noticeable when removing the top cap for refilling. This isn’t a big deal either, but it’s worth mentioning, as it’s quite visible on the SS color. The other is that when the tank slightly overflows, a liquid bubble forms in each filling port. They didn’t disappear until I blew into the filling port, except for the one where I started filling. Although I think this can be avoided by not overfilling, meaning the liquid shouldn’t reach the filling port, but stay just below it. I’m not sure if this is a problem, as it can be resolved with a single puff, and of course, if there’s space for the liquid to flow, this won’t happen, so it’s not a defect, just my mistake, but it’s worth paying attention to. The build deck screws are similarly tight as any other part of the tank. So don’t be surprised if you need strength to change the coil. For me, this is also a positive, as it holds the wire legs in place as it should! Honestly, the previous two Ares tanks weren’t as solid as this one! But it’s better for it to be like this than for something to come loose, unscrew, or fall apart.
The dual airflow system deserves a separate paragraph; it’s that brilliant! The internal airflow can naturally be adjusted anywhere, but I think there are three positions that best harmonize with the external ring. If the internal is fully open, the best matching airflow on the external is fully open, or with 6 and 5 holes. These settings are still RDL compatible. However, if we set the internal to the middle, the best matching positions on the external are with 5, 4, and 3 holes in the air inlet. And if we completely restrict the internal, it’s best used with the 3, 2, and 1 hole settings on the external airflow adjuster. Of course, you need to vary the coil slightly for these settings, but that’s precisely what’s good about this tank: the possibilities are practically limitless, while remaining within the MTL usage scope. If there are too many wraps on the coil relative to the air inlets, it’s not a problem, but the coil will gunk up faster, so it’s definitely worth experimenting with at least the number of wraps. The inner diameter can remain at 2.5mm with restricted airflow, as the air can circulate around it due to the design, but it struggles with a 3mm ID, potentially causing some heating, though I found it not to be severe.Regarding the experience, it can bring out truly superb flavors, almost instantly! Of course, this also depends on the cotton, but with Cotton Cloud’s, a 3mm inner diameter, and using a bit more cotton, the flavor was not long in coming. It strongly delivers the milder desserts (like the vanilla King’s Crest Duchess), but with the same intense fervor, it can also convey tobacco compositions. What personally surprised me was my chocolate-jam mixture (Aromamesteres Chocho Passion), where the chocolate and jam didn’t overpower each other; on the contrary, the jam got a high note that made the chocolate flavor stand out compared to my other tanks. In three words: Perfect for any liquid! The vapor is also absolutely satisfying, of course, this is in interaction with the wattage, but I think we can easily go beyond 20 watts if the Ares Finale gets a truly wide RDL setup and coil. The 4.5ml capacity was more than enough for me for over half a day with the coils presented above. So, from 6 AM to roughly 4 PM, I was easily fine with one charge, which can be considered quite satisfying. This tank could even be taken on a hike, you wouldn’t have to worry about constant refilling. Thanks to the dual airflow adjustment system, the experience is maximally customizable, which of course also requires customizing the coil, but everyone will see that for themselves. I tried 2.5mm and 3mm inner diameters, partly because it works with relatively a lot of air compared to my user habits, so I immediately discarded the 2mm inner diameter, fearing it would overcool. After seeing the cotton wicking, my decision was confirmed. I also discarded the MTL Clapton, because I think this airflow system is too narrow for that. Of course, I don’t rule out that it would be perfect with MTL Clapton, I just didn’t consider it the smartest choice after seeing the tank. Naturally, I also took the manufacturer’s recommendation into account when building the coil, which is why I stuck with wire. With it, however, I had a huge MTL experience! Nevertheless, we should be careful that the wicking limits the amount of cotton, and it easily floods the chamber if there is too little cotton with a too small inner diameter. That’s why I didn’t take the risk, I started directly from a 2.5mm inner diameter. Although the manufacturer’s recommendation strongly steers towards Kanthal, I personally believe that any type of wire can perform well in the Ares Finale, because thanks to the ample airflow, there is no MTL setup that would cool poorly in it!
Finally, I can’t find fault! Really not, even though I tried. In my opinion, this tank is so complete, and produces such flavor and vapor that any high-end tank would envy it! So I say, every MTL vaper, whether beginner or not, needs an Innokin Ares Finale in their arsenal!
Thank you for reading! Have a nice day! ![]()